Python Celery & RabbitMQ Tutorial
Python Celery & RabbitMQ Tutorial
Python Celery & RabbitMQ Tutorial를 번역한 겁니다.
이 튜토리얼에서는 RabbitMQ를 사용하는 Celery의 기본 개념에 대해 소개하고, 작은 데모 프로젝트를 위한 Celery를 설정합니다. 튜토리얼 마지막엔 Celery 웹 콘솔을 설정하여 작업을 모니터링 할 수 있습니다.
Basic Concepts
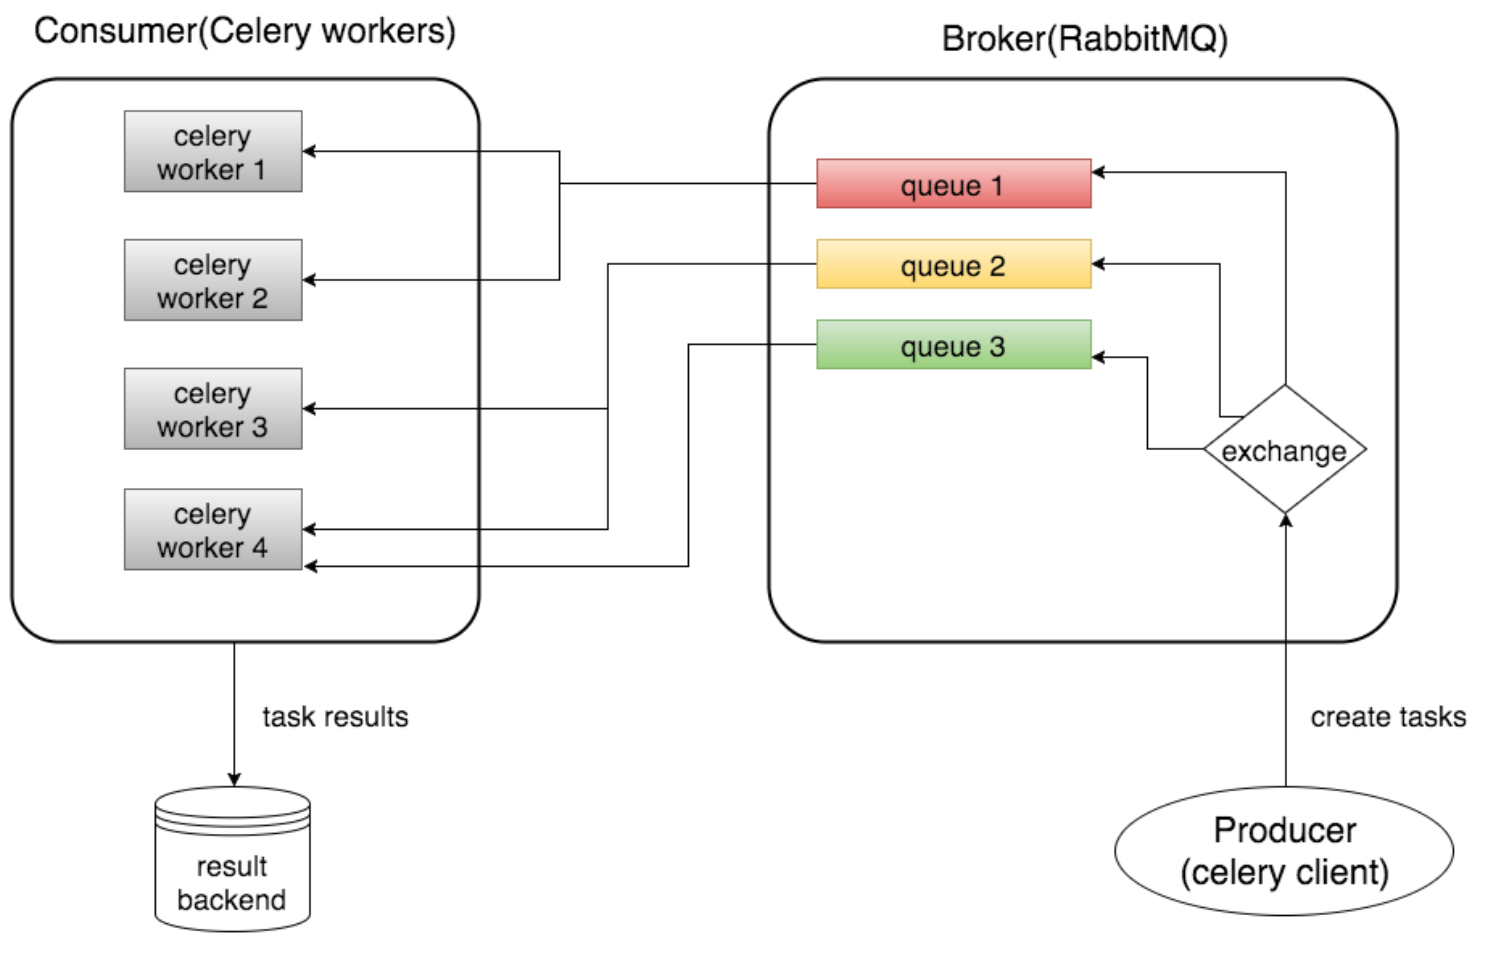
Broker
Broker(RabbitMQ)는 작업 큐 생성, 일부 라우팅 규칙에 따라 작업 큐에 작업 발송, 작업 큐에서 worker로 작업 전달을 담당합니다.
Consumer(Celery Worker)
Consumer는 작업을 수행하는 하나 이상의 Celery Worker입니다. UseCase에 따라 많은 worker를 시작할 수 있습니다.
Result BackEnd
Result BackEnd는 작업 결과를 저장하는데 사용합니다. 필수요소는 아니기 때문에 설정에 포함시키지 않으며, 작업 결과에 액세스 할 수 없습니다.
Install Celery
$ pip install celery
가상 환경에 설치하세요.
choose a broker: RabbitMQ
왜 broker가 필요할까요? Celery는 실제로 메시지 큐 자체를 구성하는 것은 아니기 때문에 이 작업을 수행하려면 추가 메시지 전송(broker)이 필요합니다. Celery는 메시지 브로커를 감싸는 래퍼로 생각할 수 있습니다.
실제로 RabbitMQ, Redis 또는 DB(ex:Django 데이터베이스)와 같은 몇 가지 브로커 중에서 선택할 수 있습니다.
RabbitMQ는 Celery에서 권장하고 있고, 브로커로서 기능을 완벽하게 갖추고 안정적입니다. Mac OS에서는 Homebrew로 쉽게 설치가 가능합니다.
$ brew install rabbitmq
start RabbitMQ
Homebrew는 /usr/local/sbin에 RabbitMQ를 설치합니다.
설치 후 환경변수 PATH에 추가합니다.
# bash shell을 사용한다면.. ~/.bash_profile
PATH=$PATH:/usr/local/sbin
MacOS 버전에 따라 설치 경로가 다른 것이 확인되었습니다. 해결법은 RabbitMQ 설치시 SBIN 디렉토리가 없다?
이제 명령으로 RabbitMQ 서버를 시작할 수 있습니다.
$ rabbitmq-server

  ##  ##
  ##  ##      RabbitMQ 3.7.10. Copyright (C) 2007-2018 Pivotal Software, Inc.
  ##########  Licensed under the MPL.  See http://www.rabbitmq.com/
  ######  ##
  ##########  Logs: /usr/local/var/log/rabbitmq/rabbit@localhost.log
                    /usr/local/var/log/rabbitmq/rabbit@localhost_upgrade.log

              Starting broker...
 completed with 6 plugins.
configure RabbitMQ for Celery
Celery에 RabbitMQ를 사용하기 전에 RabbitMQ에 가상 호스트와 사용자를 생성하고, 가상 호스트에 액세스할 수 있도록 사용자 권한을 설정해야 합니다.
# add user 'doky' with password 'doky123'
$ rabbitmqctl add_user doky doky123

# add virtual host 'doky_host'
$ rabbitmqctl add_vhost doky_host

# add user tag 'doky_tag' for user 'doky'
$ rabbitmqctl set_user_tags doky doky_tag

# set permission for user 'doky' on virtual host 'doky_host'
# ".*" ".*" ".*" 는 configure, write, read
$ rabbitmqctl set_permissions -p doky_host doky ".*" ".*" ".*"
A Simple Demo Project
이제 Celery의 사용법을 보여주는 간단한 프로젝트를 진행합니다.
jimmykobe1171’s github에 데모가 들어 있습니다.
Project Structure
test_celery
├── celery.py
├── run_tasks.py
└── tasks.py
celery.py
from __future__ import absolute_import
from celery import Celery

app = Celery('test_celery',
             broker='amqp://jimmy:jimmy123@localhost/jimmy_vhost',
             backend='rpc://',
             include=['test_celery.tasks'])
app이라는 Celery 인스턴스를 초기화합니다. 이 인스턴스는 나중에 작업 생성에 사용됩니다.
- Celery의 첫 번째 인수는 “test_celery”라는 프로젝트 패키지의 이름입니다.
broker인수는 브로커 URL을 지정합니다.- 브로커 URL 형식 :
transport://userid:password@hostname:port/virtual_host - RabbitMQ의
transport는amqp backend인수는 백엔드 URL을 지정합니다. Celery의 백엔드는 테스크 결과를 저장하는데 사용됩니다. 따라서 작업이 끝나고 결과에 액세스해야 한다면 Celery에 대한 백엔드를 설정해야 합니다.rpc는 결과를 AMQP 메시지로 보내는 것을 의미합니다. 이 메시지는 데모에서 사용할 수 있는 형식힙니다.include인수는 Celery Worker를 시작할 때 가져올 모듈의 리스트를 지정합니다.
tasks.py
from __future__ import absolute_import
from test_celery.celery import app
import time


@app.task
def longtime_add(x, y):
    print 'long time task begins'
    # sleep 5 seconds
    time.sleep(5)
    print 'long time task finished'
    return x + y
‘celery.py’에서 정의한 ‘app’를 가져와서 task 메소드를 데코레이터로 사용합니다. 또한 ‘longtime_add’는 시간이 많이 걸리는 작업을 시뮬레이트하기 위해 5초간 작업합니다.
run_tasks.py
from .tasks import longtime_add
import time

if __name__ == '__main__':
    result = longtime_add.delay(1,2)
    # 이 지점에서 작업이 완료되지 않으므로 False를 반환합니다.
    print 'Task finished? ', result.ready()
    print 'Task result: ', result.result
    # 10초 후 작업이 완료됩니다.
    time.sleep(10)
    # 이 지점에서 작업이 완료되고 ready()가 True를 반환합니다.
    print 'Task finished? ', result.ready()
    print 'Task result: ', result.result
- 여기에서는 ‘longtime_add’ 메서드를 사용하여 작업을 호출합니다.
delay메서드는 작업을 비동기적으로 처리하는 경우 필요합니다. 또한 작업 결과를 유지하고 정보를 출력합니다.ready는 작업이 완료되면 true, 그렇지 않으면 false를 반환합니다.result속성은 작업의 결과입니다(우리 예제에서는 ‘3’을 반환). 작업이 완료되지 않으면 None을 반환합니다.
Start Celery Worker
아래 명령으로 Celery Worker를 시작할 수 있습니다. (test_celery의 상위 디렉터리에서 실행)
$ celery -A test_celery worker --loglevel=info


celery@MacBook-Pro.local v4.2.1 (windowlicker)

Darwin-18.2.0-x86_64-i386-64bit 2019-01-23 09:21:51

[config]
.> app:         test_celery:0x102ced0f0
.> transport:   amqp://doky:**@localhost:5672/doky_host
.> results:     rpc://
.> concurrency: 8 (prefork)
.> task events: OFF (enable -E to monitor tasks in this worker)

[queues]
.> celery           exchange=celery(direct) key=celery


[tasks]
  . test_celery.tasks.longtime_add

[2019-01-23 09:21:51,744: INFO/MainProcess] Connected to amqp://doky:**@127.0.0.1:5672/doky_host
[2019-01-23 09:21:51,760: INFO/MainProcess] mingle: searching for neighbors
[2019-01-23 09:21:52,812: INFO/MainProcess] mingle: all alone
[2019-01-23 09:21:52,829: INFO/MainProcess] celery@MacBook-Pro.local ready.
Run Tasks
다른 콘솔에서 다음 명령을 실행하세요.(test_celery 상위 디렉터리에서 실행)
$ python -m test_celery.run_tasks
Celery 콘솔에 worker가 작업을 받는 것을 볼 수 있습니다.
# Celery Worker가 작업을 받으면 task ID가 있는 작업 이름이 괄호 안에 출력됩니다.
[2019-01-23 09:25:16,976: INFO/MainProcess] Received task: test_celery.tasks.longtime_add[7e53534d-c637-4432-9d31-c62e7d9caf80]

# longtime_add를 실행하고 5초의 시간지연이 있습니다.
[2019-01-23 09:25:16,978: WARNING/ForkPoolWorker-1] long time task begins
[2019-01-23 09:25:21,980: WARNING/ForkPoolWorker-1] long time task finished

# 작업이 약 10초 만에 끝났고 작업 결과가 3임을 보여줍니다.
[2019-01-23 09:25:22,007: INFO/ForkPoolWorker-1] Task test_celery.tasks.longtime_add[7e53534d-c637-4432-9d31-c62e7d9caf80] succeeded in 5.029366292001214s: 3
현재 콘솔에는 다음과 같이 출력됩니다.
$ python -m test_celery.run_tasks
Task finished?  False
Task result:  None
Task finished?  True
Task result:  3
예상대로 작동되었습니다. 처음에는 작업이 준비되지 않았으니 결과는 None입니다. 5초 후 작업이 완료되었습니다.
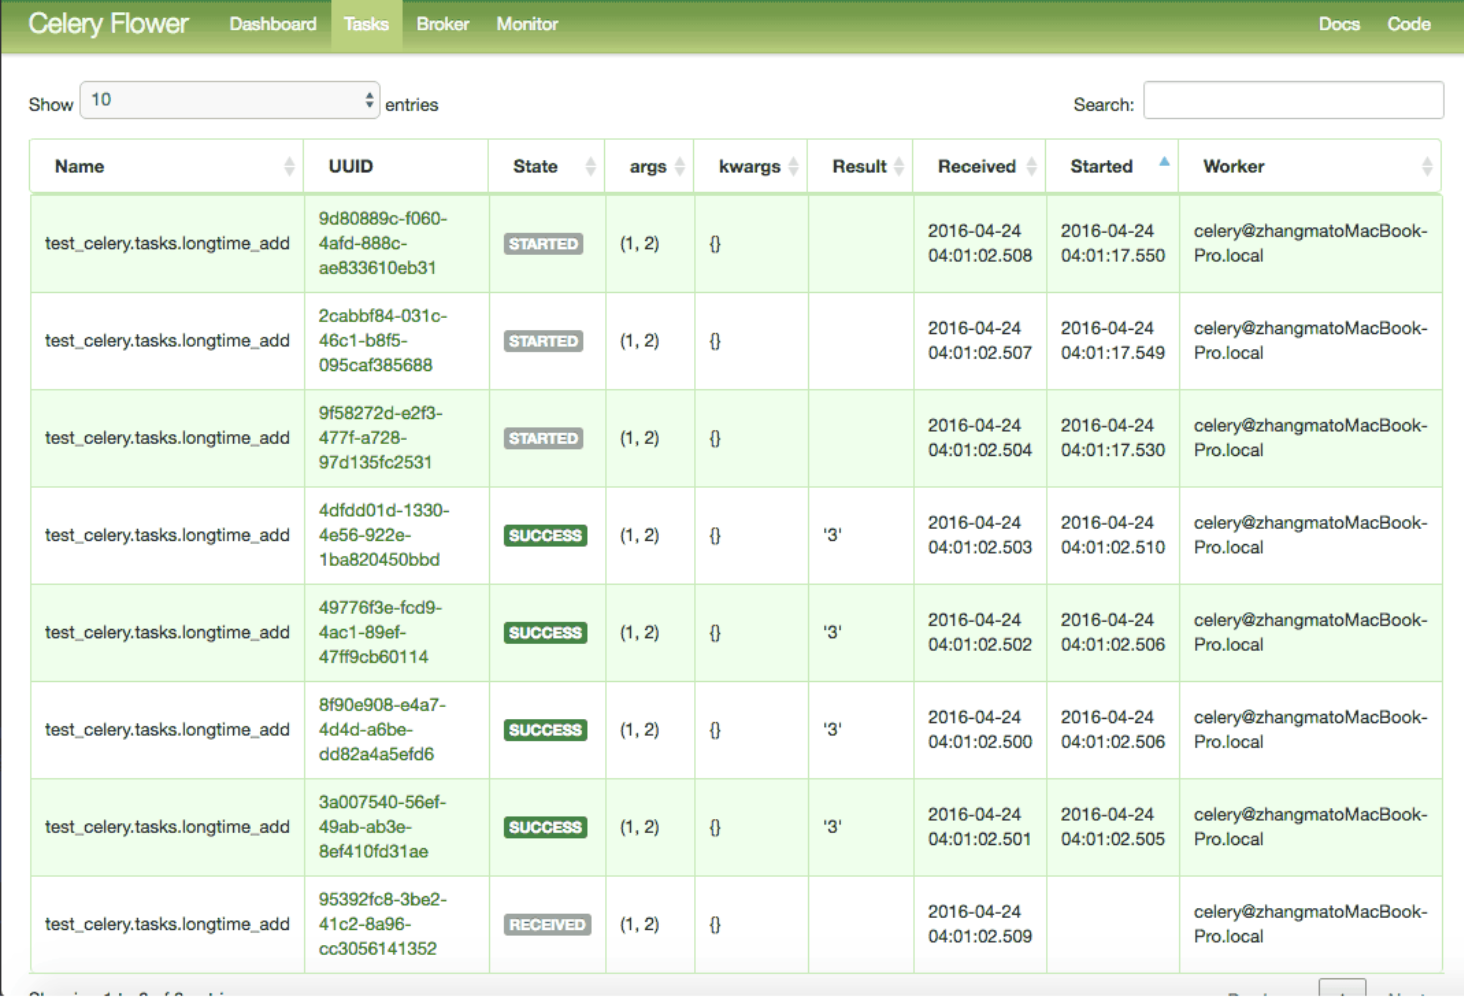
Monitor Celery in Real Time
Flower는 Celery를 위한 실시간 웹 기반 모니터입니다. Flower를 사용하면 작업 진행 상황과 기록을 쉽게 모니터링 할 수 있습니다.
pip로 설치할 수 있습니다.
$ pip install flower
Flower 웹 콘손을 실행합니다.(test_celery 상위 폴터에서 실행)
$ celery -A test_celery flower
Flower는 5555를 기본 포트로 사용하여 서버를 실행하고 http://localhost:5555에서 액세스할 수 있습니다.
Conclusion
Celery는 RabbitMQ 보로커와 함께 사용하면 쉽게 설정할 수 있고, RabbitMQ의 복잡한 세부 정보는 숨깁니다.
Let me know what you think of this article in the comment section below!