Python - Basic Socket Programming in Python
소켓 공부를 하다가 심플한 예제가 필요해서 Basic Socket Programming in Python의 포스팅을 번역하였습니다.
Basic Socket Programming in Python
일반적으로 네트워크 서비스는 client/server 모델을 따릅니다.
서버는 특정 서비스를 제공하고, 클라이언트는 이 서비스를 사용합니다.
네트워크를 통해 통신하려면 네트워크 소켓이 작동해야 합니다. 이러한 종류의 소켓 통신은 프로세스 간 통신(Inter Process commutication. IPC)을 위해 컴퓨터 내부적으로 사용 될 수 있습니다.
이 포스팅에서는 Python을 사용하여 네트워크 소켓을 통해 통신하는 간단한 client/server 애플리케이션을 구현합니다.
이 예제는 간단히 하기 위해 stdout으로 출력합니다.
client/server 프로그램의 배경은 기상 관측소의 센서로, 시간 경과에 따라 온도 데이터를 수집하고, 수집 된 데이터를 서버 응용 프로그램에 보내어 데이터가 더 많이 처리되도록 합니다.
What is a Socket?
네트워크 소켓은 네트워크에서 실행 중인 두 프로세스(client/server) 간의 양방향 통신 링크의 endpoint입니다.
두 프로세스는 네트워크 소켓에 읽기, 쓰기를 함으로써 서로 통신합니다.
Example
소켓 기능을 사용하려면 Python의 socket 모듈만 있으면 됩니다. 아래의 예제 코드에서 기상 관측소를 시뮬레이션하고 시간 계산을 단순화하기 위해 Python 시간 모듈을 가져옵니다.
이 경우 클라이언트와 서버 모두 동일한 컴퓨터에서 실행됩니다. 소켓은 대응하는 포트 번호를 가지면, 여기서는 ‘23456’ 입니다. 1024 ~ 65535 사이의 제한되지 않는 번호 범위에서 다른 포트를 선택할 수 있습니다.
Server
socket 모듈을 로드하면 인터넷 스트리밍 소켓은 socket.socket 클래스를 사용하여 socket.AF_INET(주소 체계가 IP4v) 및 socket.SOCK_STREAM(소켓 타입)의 두 매개 변수를 만듭니다. gethostname()(호스트 이름), getfqdn()(완전한 도메인 이름), gethostbyname()(IP 주소) 메소드에 의해 각각이 수행됩니다. 다음으로 소켓은 bind() 메소드를 사용하여 IP 주소와 포트 번호 23456에 바인딩됩니다.
listen() 메소드로 서버는 지정된 포트에서 들어오는 연결을 수신 대기합니다. while 루프에서 서버는 들어오는 요청을 기다리고, accept() 메서드를 사용하여 요청을 수락합니다. 클라이언트가 제출한 데이터는 recv() 메소드를 통해 64바이트로 읽혀지고 stdout으로 출력됩니다. 마지막으로 클라이언트에서 추가 데이터를 보내지 않으면 현재 연결이 닫힙니다.
# load additional Python module
import socket

# create TCP/IP socket
sock = socket.socket(socket.AF_INET, socket.SOCK_STREAM)

# retrieve local hostname
local_hostname = socket.gethostname()

# get fully qualified hostname
local_fqdn = socket.getfqdn()

# get the according IP address
ip_address = socket.gethostbyname(local_hostname)

# output hostname, domain name and IP address
print ("working on %s (%s) with %s" % (local_hostname, local_fqdn, ip_address))

# bind the socket to the port 23456
server_address = (ip_address, 23456)
print ('starting up on %s port %s' % server_address)
sock.bind(server_address)

# listen for incoming connections (server mode) with one connection at a time
sock.listen(1)

while True:
    # wait for a connection
    print ('waiting for a connection')
    connection, client_address = sock.accept()

    try:
        # show who connected to us
        print ('connection from', client_address)

        # receive the data in small chunks and print it
        while True:
            data = connection.recv(64)
            if data:
                # output received data
                print ("Data: %s" % data)
            else:
                # no more data -- quit the loop
                print ("no more data.")
                break
    finally:
        # Clean up the connection
        connection.close()
Client
클라이언트는 소켓의 사용을 제외하고는 서버 측과 거의 비슷합니다. 클라이언트는 connect() 메서드를 사용합니다. for 루프에서 온도 데이터는 sendall() 메서드를 사용하여 서버로 전송된니다. time.sleep(2) 메서드를 호출하여 다른 온도 판독 값을 보내기 전에 클라이언트를 2초동안 일시 중시합니다. 마지막으로 모든 온도 데이터가 목록에서 전송된 후 close() 메서드를 사용하여 연결을 닫습니다.
# load additional Python modules
import socket
import time

# create TCP/IP socket
sock = socket.socket(socket.AF_INET, socket.SOCK_STREAM)

# retrieve local hostname
local_hostname = socket.gethostname()

# get fully qualified hostname
local_fqdn = socket.getfqdn()

# get the according IP address
ip_address = socket.gethostbyname(local_hostname)

# bind the socket to the port 23456, and connect
server_address = (ip_address, 23456)
sock.connect(server_address)
print ("connecting to %s (%s) with %s" % (local_hostname, local_fqdn, ip_address))

# define example data to be sent to the server
temperature_data = ["15", "22", "21", "26", "25", "19"]
for entry in temperature_data:
    print ("data: %s" % entry)
    new_data = str("temperature: %s\n" % entry).encode("utf-8")
    sock.sendall(new_data)

    # wait for two seconds
    time.sleep(2)

# close connection
sock.close()
Running the Server and Client
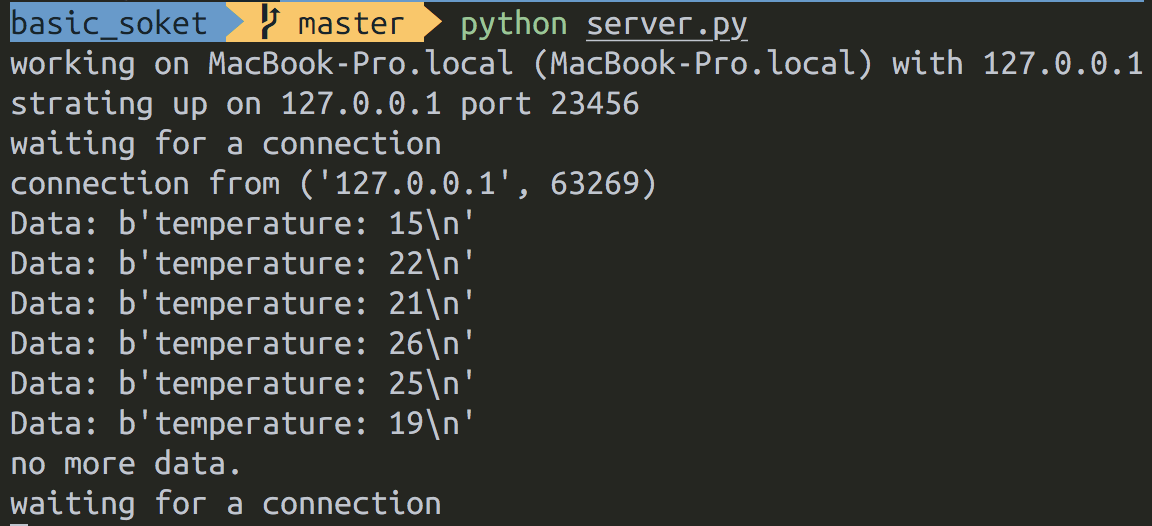
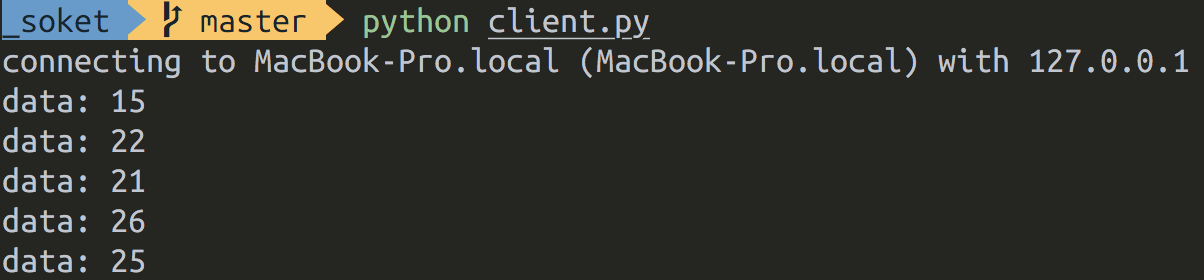
터미널 창 두 개를 열어서 서버, 클라이언트 프로그램을 실행합니다.
서버 파일을 먼저 실행하고, 다음으로 클라이언트 파일을 실행합니다.
파이썬 소켓 연결 사용법 여기도 잘 설명해 두셨으니 참고.
Let me know what you think of this article in the comment section below!