TaskBuster Django Tutorial – Part 10 - Model creation, ForeignKey relations, testing and the Django Admin
Model creation, ForeignKey relations, testing and the Django Admin
이번 파트에서는 우리의 모델을 계속 정의합니다. 우리는 Project와 Tag 모델을 정의 할 것이며, Profile 모델과 Foreign Key 관계를 가지고 있습니다.
또한, inline model 을 사용하여 custom validation, 테스트, customizing Admin Site 에 대해 설명합니다.
이번 파트의 개요입니다.
- UML Diagram 수정
- The Project Model: Foreign Key Relationships and custom validators
- Tests for the Project Model
- Django Admin for the Project Model: custom list display and Model Inline
- The Tag Model: Another simple model with a ForeignKey relationship
UML Diagram Revision
마지막으로 User 모델과 OneToOne 관계가 있는 Profile 모델을 만들었습니다.
모델의 UML 다이어그램을 살펴봅시다.
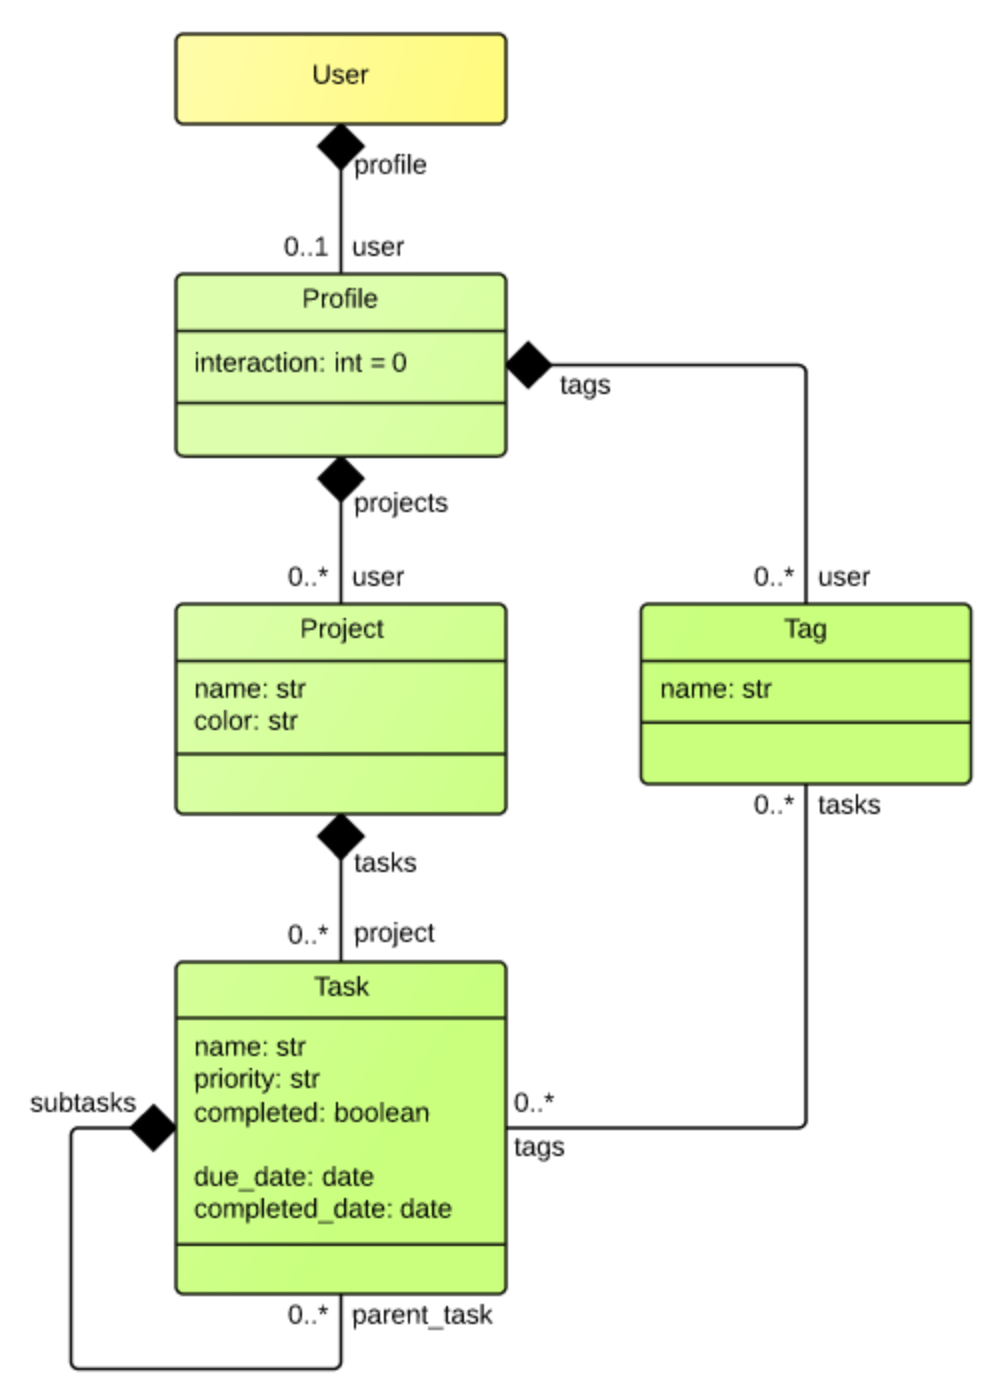
요점은 다시 언급하자면,
- Profile 모델에는 User 모델과 OneToOne 관계가 있습니다.
- Project 모델과 Tag 모델 모두 Profile 모델과 ForeignKey 관계가 있으며,
- Task 모델에는
- Project 모델과의 ForeignKey 관계
- Tag 모델과의 ManyToMany 관계
- Task 모델(자기 자신)의 자체 ForeignKey 관계
The Project Model: Foreign Key Relationships and custom validators
먼저 여러 태그 이름으로 작업을 그룹화하는데 사용할 Project 모델을 정의합니다.
이 모델에 대한 자세한 UML 다이어그렘입니다.

‘taskbuster/apps/taskmanager/models.py’에 추가합니다.
from django.core.validators import RegexValidator


class Project(models.Model):
    # Relations
    user = models.ForeignKey(
        Profile,
        related_name="projects",
        verbose_name=_("user")
        )
    # Attributes - Mandatory
    name = models.CharField(
        max_length=100,
        verbose_name=_("name"),
        help_text=_("Enter the project name")
        )
    color = models.CharField(
        max_length=7,
        default="#fff",
        validators=[RegexValidator(
            "(^#[0-9a-fA-F]{3}$)|(^#[0-9a-fA-F]{6}$)")],
        verbose_name=_("color"),
        help_text=_("Enter the hex color code, like #ccc or #cccccc")
        )
    # Attributes - Optional
    # Object Manager
    objects = managers.ProjectManager()
    # Custom Properties
    # Methods

    # Meta and String
    class Meta:
        verbose_name = _("Project")
        verbose_name_plural = _("Projects")
        ordering = ("user", "name")
        unique_together = ("user", "name")

    def __str__(self):
        return "%s - %s" % (self.user, self.name)
‘taskbuster/apps/taskmanager/managers.py’에 추가합니다.
class ProjectManager(models.Manager):
    pass
이 코드는 다음과 같습니다.
- Project 모델은 Profile 모델과 ForeignKey 관계
- 각 프로젝트 인스턴스는 하나의 사용자 프로필과 관련이 있어야 합니다.(프로필 필드는 필수 항목 임)
- 각 사용자 프로필은 0개, 하나 이상의 프로젝트와 관련이 될 수 있습니다.
- myproject라는 프로젝트 인스턴스에서 다음과 같은 관련 profile을 얻을 수 있습니다. :
myproject.user - Project에 정의된 속성 이름은 profile이 아니라 user 입니다.
- myprofile라는 프로필 인스턴스에서 다음과 같은 관련 project을 얻을 수 있습니다. :
myprofile.projects.all() - related_name을 지정하지 않으면 기본적으로
myprofile.projects.all()을 사용하여 profile의 project를 엑세스해야 합니다. myprofile.project는 object manager를 반환하므로 프로젝트 인스턴스를 가져오려면all(),filter(),exclude()등과 같은 일반적인 쿼리 메서드를 사용해야 합니다. custom ProjectManager 클래스에 정의된 custom 메서드를 호출 할 수도 있습니다.- 이번 부분에서 보았듯이, 자세한 이름은 이 속성의 사람이 읽을 수 있는 이름을 나타냅니다.
- ugettext_lazy 변환 함수를 사용한다는 점을 유의하세요.
- 프로젝트의 이름은 CharField 속성이며, 최대 길이는 100자입니다.
- help_text 는 model forms에 표시되는 텍스트이므로 사용자는 작성해야 할 내용을 알 수 있습니다.
- Color 는 다른 CharField 속성이며, 최대 길이는 7입니다.
- Hex color는 3자리 16진수로 구성되어 있으며, 00부터 FF 사이에 있고, red, green, blue의 레벨을 나타냅니다. 합쳐 쓰면 #XXXXXX 와 같은
#을 더한 6개의 문자열을 만듭니다. - 예를 들어, black은 #000000, white는 #FFFFFF 입니다.
- 하지만 3개의 숫자가 #001122와 같이 같은 쌍으로 구성될 경우 각 숫자는 #012와 같이 한 자리로 축약 될 수 있습니다. 이 방법으로 black은 #000, white는 #FFF로 쓸 수 있습니다.
- 기본적으로 이 필드는 white입니다.
- 올바른 16진수 값을 허용하기 위해 custom validator를 사용합니다. RegexValidator 는 지정된 정규 표현식과 일치하는 문자열만 허용합니다.
- 우리는 managers.py, ProjectManager에 정의된 custom object manager를 포함합니다.
- Meta에서는 이렇게 정의합니다:
- 사람이 읽을 수 있는 클래스의 이름
- 프로젝트 인스턴스 질의의 기본 정렬 순서
- 데이터베이스 레벨에서 정의한
unique_together속성은 같은 프로필의 경우 같은 이름의 두 프로젝트를 작성할 수 없습니다. - str 메서드는 str() 메서드가 admin 사이트와 같이 객체에 호출되거나 Django 템플릿에 객체를 보여줄 때마다 호출됩니다.
이제 모델을 정의했으므로, 이러한 변경 사항을 데이터베이스로 마이그레이션 해야 합니다.
$ python manage.py check
$ python manage.py makemigrations taskmanager
$ python manage.py migrate taskmanager
다음은 이 모델에 대한 몇 가지 테스트를 작성합니다.
Tests for the Project Model
Django 모델에 대한 테스트를 작성할 때 일반적으로 DJango의 기본값이 아닌 속성이나 동작을 가진 custom 특성과 함수에만 집중합니다.
예를 들어 CharField에서 max_length의 올바른 동작을 테스트하지는 않습니다. 내장 된 기능이므로 Django 개발자가 충분히 테스트를 마쳤습니다.
그러나 color 속성의 사용자 지정 유효성 검사를 위한 졸은 정규식을 작성했는지 테스트해야 합니다.
‘taskbuster/apps/taskmanager/tests.py’에 다음 테스트를 추가합니다.
from django.core.exceptions import ValidationError


class TestProjectModel(TestCase):

    def setUp(self):
        User = get_user_model()
        self.user = User.objects.create(
            username="taskbuster", password="django-tutorial")
        self.profile = self.user.profile

    def tearDown(self):
        self.user.delete()

    def test_validation_color(self):
        # This first project uses the default value, #fff
        project = models.Project(
            user=self.profile,
            name="TaskManager"
            )
        self.assertTrue(project.color == "#fff")
        # Validation shouldn't rise an Error
        project.full_clean()

        # Good color inputs (without Errors):
        for color in ["#1cA", "#1256aB"]:
            project.color = color
            project.full_clean()

        # Bad color inputs:
        for color in ["1cA", "1256aB", "#1", "#12", "#1234",
                      "#12345", "#1234567"]:
            with self.assertRaises(
                    ValidationError,
                    msg="%s didn't raise a ValidationError" % color):
                project.color = color
                project.full_clean()
setUp메서드는 각 시험의 시작에서 실행됩니다.- user 인스턴스를 생성합니다.
- user 인스턴스는 관련 profile 인스턴스를 생성하는 signals를 발생시킵니다.
- 둘 다 추후에 사용하기 위해 스스로 저장됩니다.
test_validation_color는 color 속성의 여러 입력 테스트를 합니다.- 먼저 기본값을 사용하여 프로젝트를 만들고 ValidationError 를 발생시키는지 확인합니다.
- 다음으로 올바른 입력을 확인합니다.
- 잘못된 입력이 ValidationError 를 발생시키는지 확인합니다.
- ValidationError를 발생시키려면 인스턴스의
full_clean()메서드를 호출해야합니다. 단순히 메서드를 저장하면 작동하지 않습니다 tearDown메서드는 각각의 테스트의 끝에서 실행됩니다.- 사용자 인스턴스를 삭제합니다.
- 사용자 인스턴스를 삭제하면 이 인스턴스에 종속된 모든 관련 인스턴스도 삭제됩니다.
- profile은 사용자에 달려있습니다.
- 프로젝트는 profile에 달려있습니다.
- 이렇게하면 테스트 데이터베이스를 테스트 시작시처럼 깨끗하게 유지할 수 있습니다.
테스트를 이해했으므로 다음과 같이 실행 할 수 있습니다.
$ python manage.py test taskbuster.apps.taskmanager.tests.TestProjectModel
Django Admin for the Project Model: custom list display and Model Inline
모델을 정의하고 테스트를 마쳤으니, Admin 사이트에 모델을 포함시킬 수 있습니다.
그러나 프로젝트가 특정 사용자 프로필과 관련되어 있으므로 이전 게시물에서 정의한 ProfileAdmin을 수정합니다. 이렇게하면 특정 프로필을 편집할 때 관련 프로젝트를 추가하거나 편집할 수 있습니다.
‘taskbuster/apps/taskmanager/admin.py’의 ProfileAdmin을 수정합니다
# -*- coding: utf-8 -*-
from django.contrib import admin
from . import models


class ProjectsInLine(admin.TabularInline):
    model = models.Project
    extra = 0


@admin.register(models.Profile)
class ProfileAdmin(admin.ModelAdmin):

    list_display = ("username", "interaction", "_projects")

    search_fields = ["user__username"]

    inlines = [
        ProjectsInLine
    ]

    def _projects(self, obj):
        return obj.projects.all().count()
서버를 실행하여 변경사항을 볼 수 있습니다.
$ python manage runserver
Admin Profile 리스트로 이동하세요. 이전 코드를 단계별로 설명합니다.
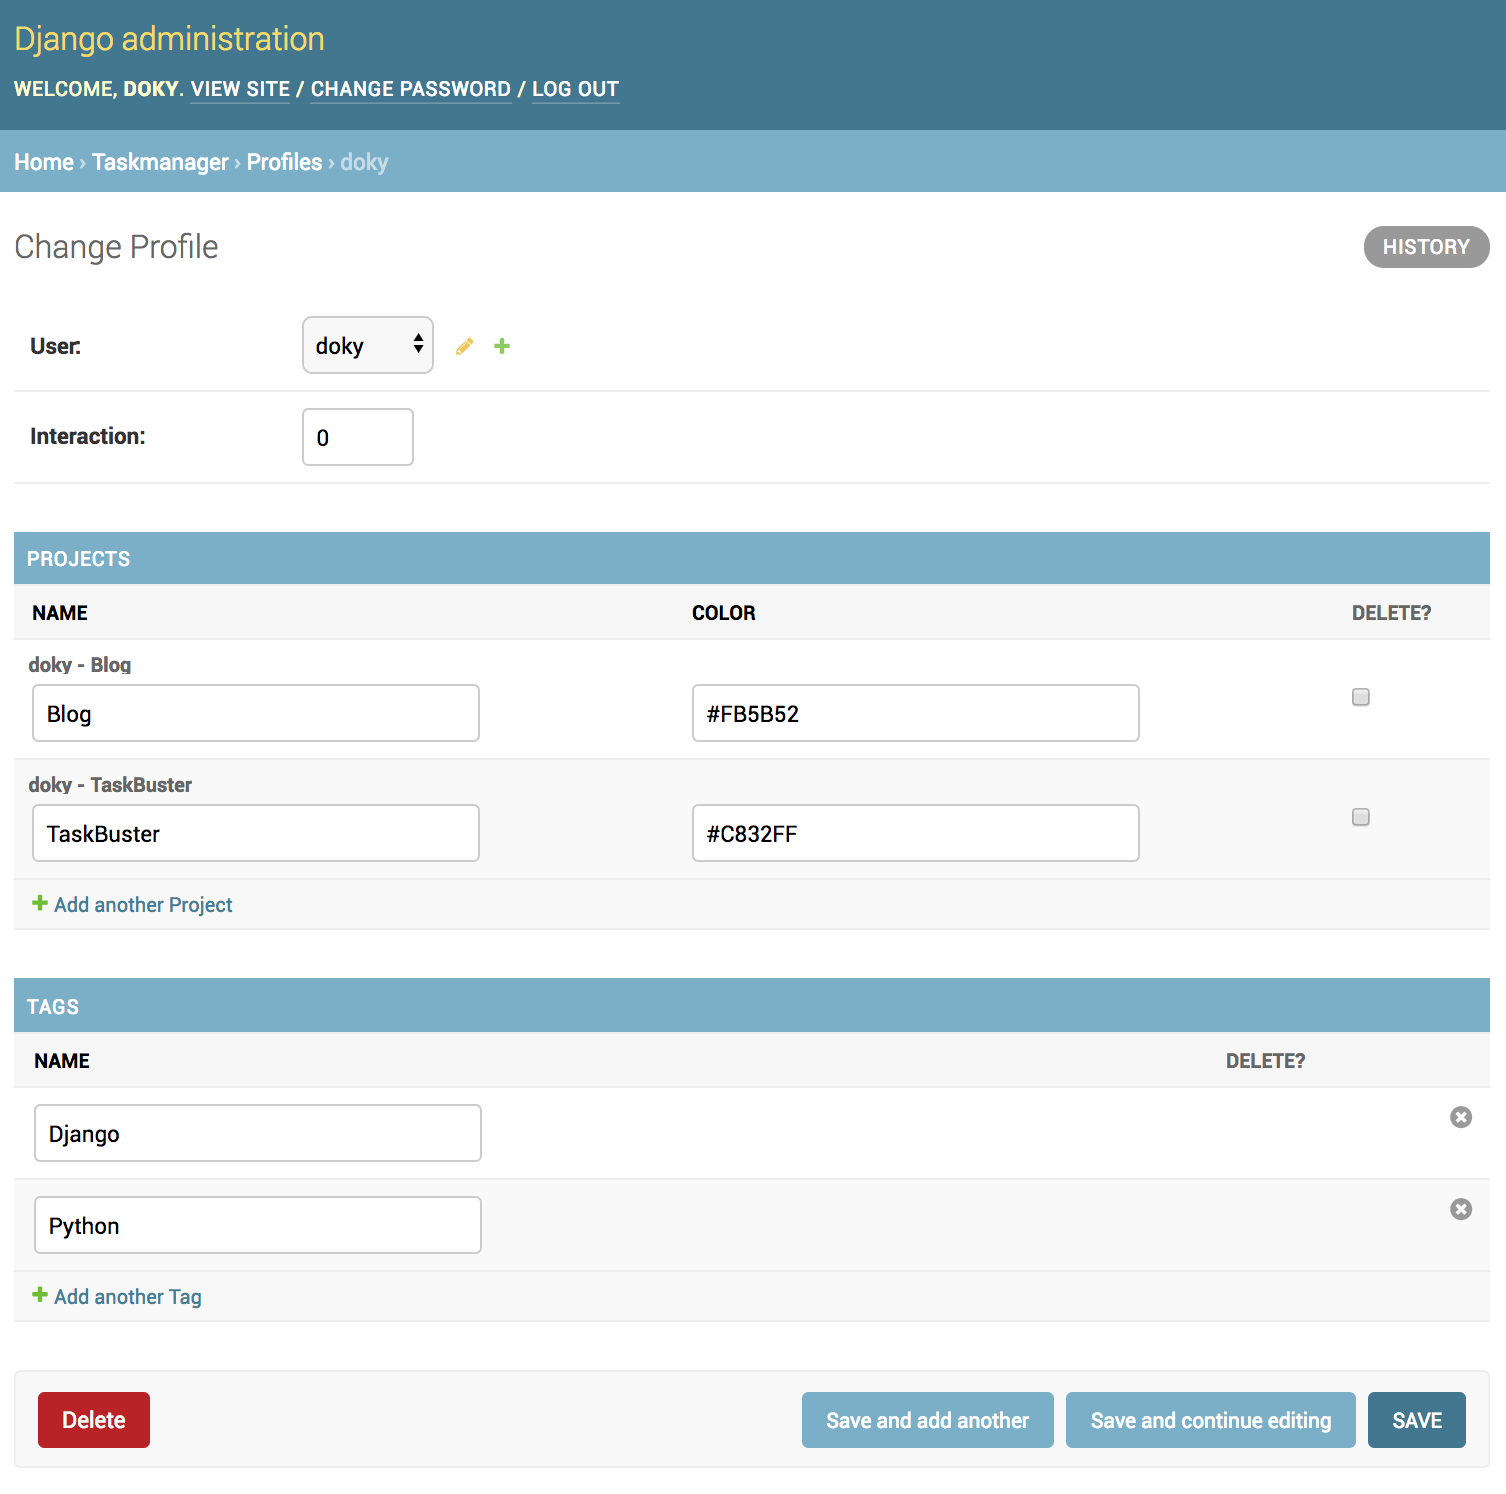
먼저, Profile 인스턴스를 수정(또는 Profile 인스턴스가 없는 경우 생성)하세요. 다음과 비슷한 것을 볼 수 있습니다.
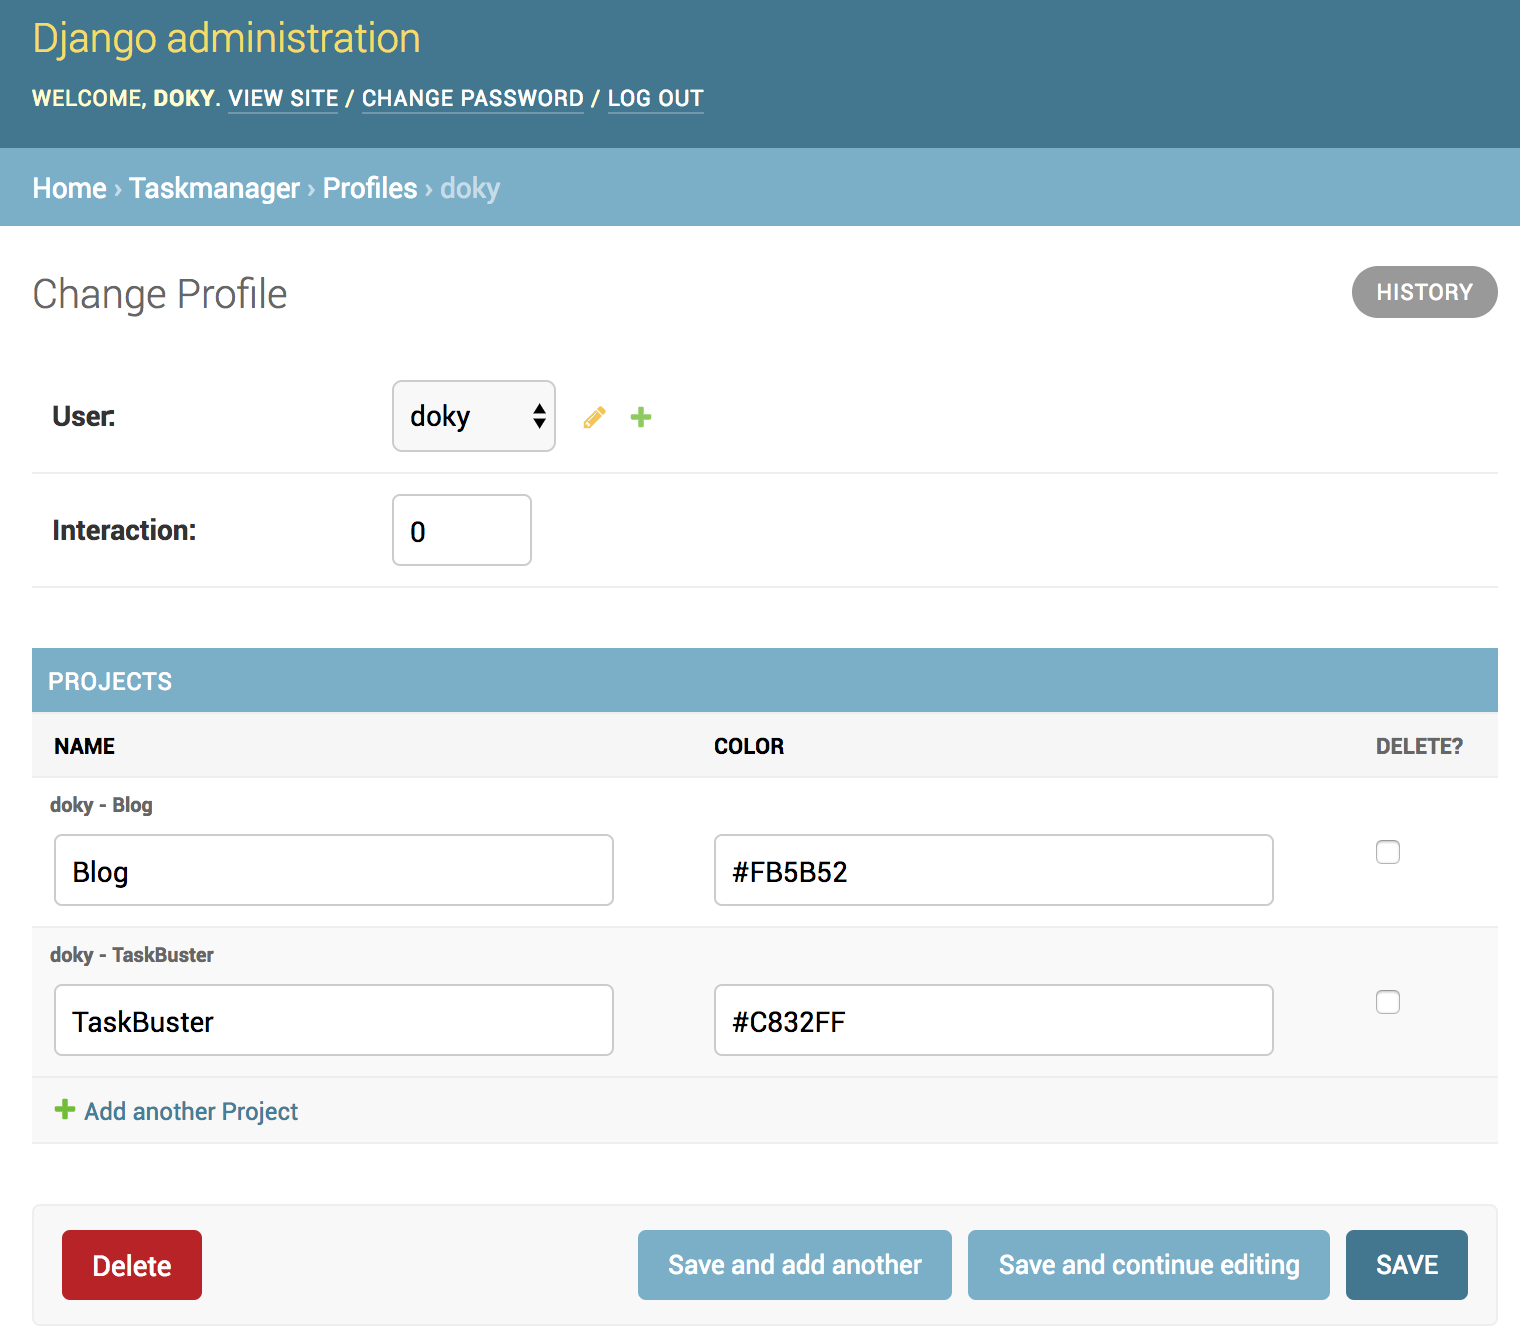
맨 아래에 블로그와 TaskBuster의 두 가지 프로젝트를 만들었습니다. 두 프로젝트가 왜 여기에 나타날까요?
Django TabularInline에서 상속받은 ProjectsInLine 클래스를 정의하면 됩니다.
class ProjectsInLine(admin.TabularInline):
    model = models.Project
    extra = 0
extra 파라미터는 Profile 인스턴스를 수정할 때 얼마나 많은 추가 프로젝트가 표시되어야 하는지 나타냅니다.(비어있는 것으로 나타납니다.) 5로 바꾸고 어떤 일이 일어나는지 확인하세요.
또한 ProjectsInLine 과 ProfileAdmin 간의 연결은 여기에서 수행됩니다.
@admin.register(models.Profile)
class ProfileAdmin(admin.ModelAdmin):
    ...
    inlines = [
        ProjectsInLine
    ]
    ...
Profile 인스턴스 내에 새 프로젝트를 만들 때 이 두 객체간의 관계가 자동으로 설정됩니다(프로젝트 인스턴스에서 Profile 필드를 지정할 필요가 없음). 또한 현재 Profile 인스턴스와 관련된 프로젝트만이 여기에 표시됩니다.
반면, Profile 리스트로 돌아가면 다음과 같은 내용이 표시됩니다.
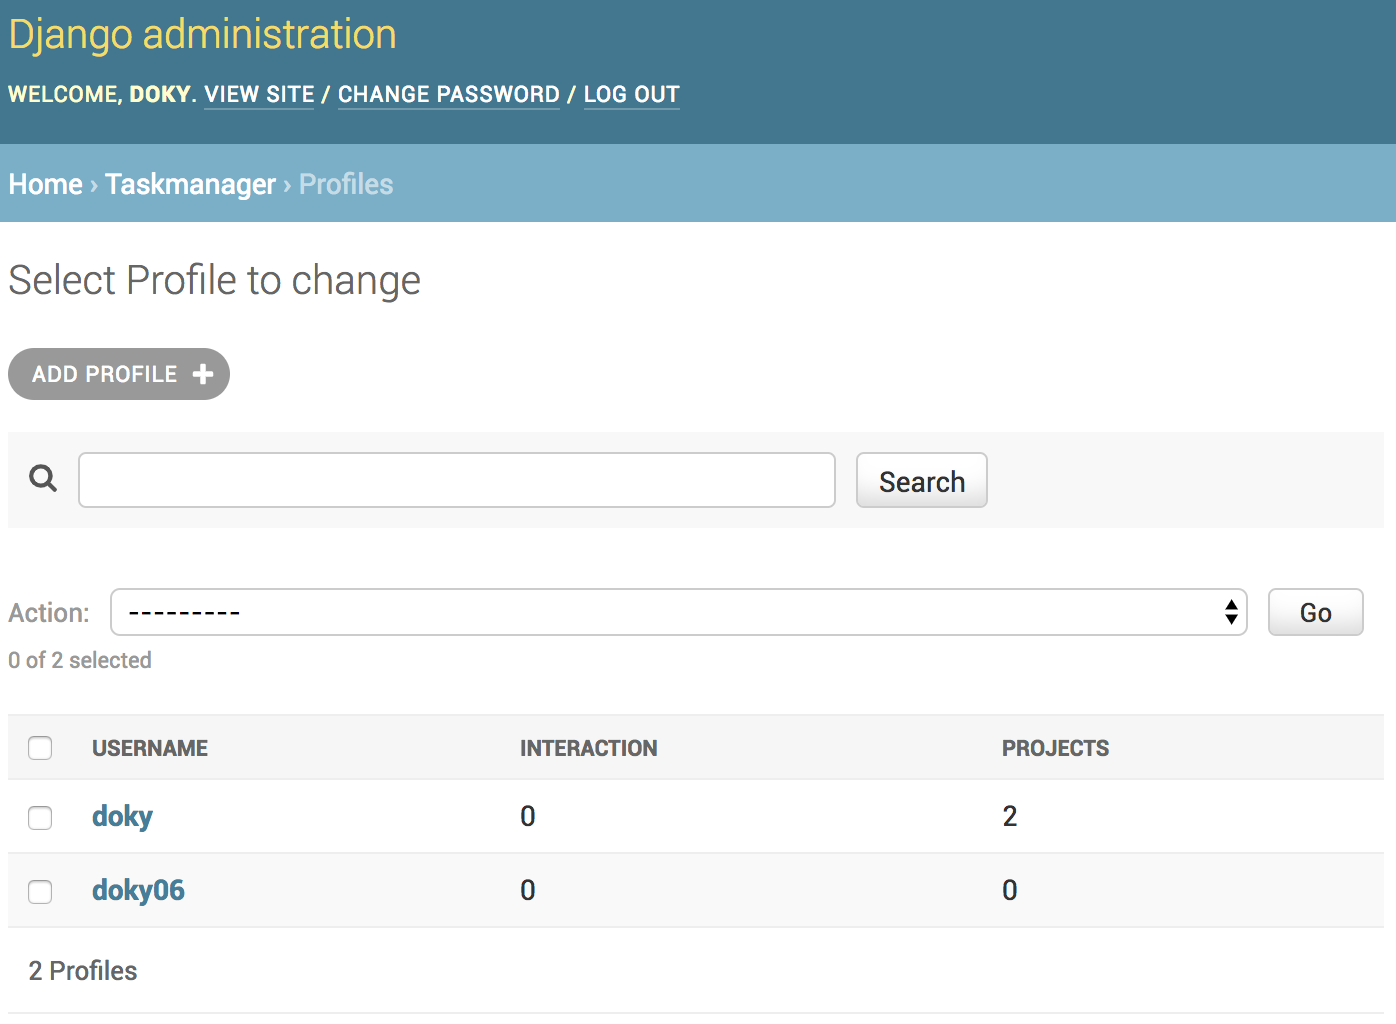
Username, Interaction, 프로젝트와 관계된 수를 지정하여 Profile 인스턴스 리스트를 보여줍니다.
여기에 모델 속성만 표시할 수 있는걸까요? 사용자 정의 함수를 정의할 수도 있습니다.
list_display 속성을 살펴봅시다.
list_display = ("username", "interaction", "_projects")
uername, interaction, 모델 속성이나 사용자 속성이 아닌 다른 속성 _projects를 포함합니다. 그러나 ProfileAdmin 내부에 정의된 사용자 정의 메서드가 표시됩니다.
def _projects(self, obj):
        return obj.projects.all().count()
self(ProfileAdmin 인스턴스)와 obj(편집주인 Profile 인스턴스)의 두 인수를 취합니다.
따라서 이 방법은 Profile 인스턴스와 관련된 모든 프로젝트를 쿼리하고 계산합니다.
The Tag Model: Another simple model with a ForeignKey relationship
UML 다이어그램에서 볼 수 있듯이 Tag 모델은 프로젝트 모델과 매우 비슷합니다.
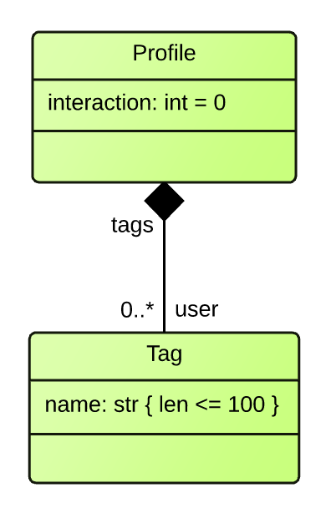
- profile 모델과 ForeignKey 관계가 있습니다.
- name property가 있습니다.
추가 기능이 없으므로 models.py와 managers.py 파일에서 직접 정의할 수 있습니다.
# models.py

class Tag(models.Model):
    # Relations
    user = models.ForeignKey(
        Profile,
        related_name="tags",
        verbose_name=_("user")
        )
    # Attributes - Mandatory
    name = models.CharField(
        max_length=100,
        verbose_name=_("Name")
        )
    # Attributes - Optional
    # Object Manager
    objects = managers.TagManager()
    # Custom Properties
    # Methods

    # Meta and String
    class Meta:
        verbose_name = _("Tag")
        verbose_name_plural = _("Tags")
        ordering = ("user", "name",)
        unique_together = ("user", "name")

    def __str__(self):
        return "%s - %s" % (self.user, self.name)
# managers.py

class TagManager(models.Manager):
    pass
그리고 admin.py 파일을 편집하여 Tag 모델을 인라인으로 추가하세요.
# admin.py

# -*- coding: utf-8 -*-
from django.contrib import admin
from . import models


class ProjectsInLine(admin.TabularInline):
    model = models.Project
    extra = 0


class TagsInLine(admin.TabularInline):
    model = models.Tag
    extra = 0


@admin.register(models.Profile)
class ProfileAdmin(admin.ModelAdmin):

    list_display = ("username", "interaction", "_projects", "_tags")

    search_fields = ["user__username"]

    inlines = [
        ProjectsInLine, TagsInLine
    ]

    def _projects(self, obj):
        return obj.projects.all().count()

    def _tags(self, obj):
        return obj.tags.all().count()
이제 데이터베이스를 마이그레이션 하세요.
$ python manage.py check
$ python manage.py makemigrations taskmanager
$ python manage.py migrate taskmanager
admin 사이트에서 결과를 확인하세요.
$ python manage.py runserver
테스트를 다시 실행하고 고장난 곳이 있는지 확인하세요.
$ python manage.py test
마지막으로 변경 사항을 git에 커밋합니다.
$ git status
$ git add .
$ git commit -m "End of part X"
Let me know what you think of this article in the comment section below!