TaskBuster Django Tutorial – Part 8 - User Authentication with a Google Account using Django Allauth
User Authentication with a Google Account using Django Allauth
이번 튜토리얼은 ‘django-allauth’ 패키지를 사용하여 사용자 인증을 관리합니다. 이 패키지는 Facebook, Twitter, Google 등의 소셜 계정을 구성합니다.
사용자가 홈페이지를 방문하면 사용 가능한 쇼셜 계정 서비스 중 하나를 사용하여 로그인(혹은 등록) 할 수 있는 아이디어가 있습니다. 또한 데이터베이스는 사용자가 이 프로세스를 통해 등록 될 때마다 새 사용자 인스턴스를 만듭니다.
이번 파트에서는 Google 인증에 중점을 두고, 언저나처럼 테스트를 작성합니다.
이 파트의 개요는 다음과 같습니다.
- Define what we expect and write a Test
- Install django-allauth
- Settings File
- Urls
- Database migrations
- Sites configuration
- Google App registration
- Allauth Django configuration
- Testing the user flow
Define what we expect and write a Test
HTML5 Boilerplate와 함께 제공되는 base.html 템플릿을 사용하지 않았기 때문에 TaskBuster 홈페이지로 이동하면 Sign In 형식의 상단 바가 표시됩니다.

로그인하지 않은 사용자에게 표시되는 ‘Sign in with Google’이라는 버튼과 다른 사용자에 대한 ‘Logout’버튼만 포함되도록 수정하려고 합니다.
‘functional_tests/test_allauth.py’에 새로운 기능 테스트를 작성합니다.
# -*- coding: utf-8 -*-
from selenium import webdriver
from selenium.webdriver.common.by import By
from selenium.webdriver.support.ui import WebDriverWait
from selenium.webdriver.support import expected_conditions as EC
from selenium.common.exceptions import TimeoutException

from django.core.urlresolvers import reverse
from django.contrib.staticfiles.testing import StaticLiveServerTestCase
from django.utils.translation import activate


class TestGoogleLogin(StaticLiveServerTestCase):

    def setUp(self):
        self.browser = webdriver.Firefox()
        self.browser.implicitly_wait(3)
        self.browser.wait = WebDriverWait(self.browser, 10)
        activate('en')

    def tearDown(self):
        self.browser.quit()

    def get_element_by_id(self, element_id):
        return self.browser.wait.until(EC.presence_of_element_located(
                (By.ID, element_id)))

    def get_button_by_id(self, element_id):
        return self.browser.wait.until(EC.element_to_be_clickable(
                (By.ID, element_id)))

    def get_full_url(self, namespace):
        return self.live_server_url + reverse(namespace)

    def test_google_login(self):
        self.browser.get(self.get_full_url("home"))
        google_login = self.get_element_by_id("google_login")
        with self.assertRaises(TimeoutException):
            self.get_element_by_id("logout")
        self.assertEqual(
            google_login.get_attribute("href"),
            self.live_server_url + "/accounts/google/login")
        google_login.click()
        with self.assertRaises(TimeoutException):
            self.get_element_by_id("google_login")
        google_logout = self.get_element_by_id("logout")
        google_logout.click()
        google_login = self.get_element_by_id("google_login")
setUp에서 브라우저를 초기화합니다.WebDriverWait는 요소가 발견되지 않을 때 예외가 발생하기 전에 브라우저가 일정 시간 대기하도록 합니다.tearDown은 브라우저를 종료합니다.get_element_by_id와get_button_by_id는WebDriverWait를 사용하여 ID로 요소를 찾는 헬프 함수입니다. 버튼의 경우 요소를 클릭 할 수 있을 때까지 기다립니다.get_full_url은 다른 테스트에서 사용한 다른 헬프 함수입니다. 역방향 이름을 가진 전체 URL을 반환합니다.- 여기에서
test_google_login이 주요 테스트입니다. 그건 홈페이지로 이동합니다. - 로그인 버튼이 있는지 확인합니다.
- 로그 아웃 버튼이 없는지 확인합니다.
- 로그인 버튼이 올바른 URL(/accounts/google/login)을 가리키고 있는지 확인합니다.
- 로그인 버튼을 클릭하면 사용자가 로그인하고 대신 로그 아웃 버튼이 표시되는지 확인합니다.
- 로그 아웃 버튼을 클락하면 사용자가 다시 로그인 버튼을 보게 됩니다.
이제 무엇을 원하는지 알았으니, ‘allauth’ 패키지를 설치하세요.
Install django-allauth
django-allauth 파키지를 설치하면 사용자가 Google이나 Twitter과 같은 다른 소셜 계정을 사용하여 등록하고 로그인할 수 있습니다.
$ pip install django-allauth
여러 라이브러리를 설치합니다.
Successfully installed django-allauth python3-openid requests-oauthlib requests defusedxml oauthlib
Cleaning up...
이들 모두 ‘requirements/base.txt’ 파일에 추가하고 테스트 환경을 설치해야 합니다.
Settings File
그런 다음, ‘settings/base.py’ 파일을 열고 django.template.context_procesors.request가 있는지 확인하세요.
TEMPLATES = [
    {
        'BACKEND': 'django.template.backends.django.DjangoTemplates',
        'DIRS': [os.path.join(BASE_DIR, "templates")],
        'APP_DIRS': True,
        'OPTIONS': {
            'context_processors': [
                'django.template.context_processors.debug',
                'django.template.context_processors.request',
                'django.contrib.auth.context_processors.auth',
                'django.contrib.messages.context_processors.messages',
                'django.template.context_processors.i18n',
                # Required by allauth template tags
                # 'django.core.context_processors.request",
                # django 2.1 ver 'django.template.context_processors',
            ],
        },
    },
]
다음으로 allauth에서 사용하는 인증 백엔드를 포함해야 합니다.
AUTHENTICATION_BACKENDS = (
    # Default backend -- used to login by username in Django admin
    "django.contrib.auth.backends.ModelBackend",
    # `allauth` specific authentication methods, such as login by e-mail
    "allauth.account.auth_backends.AuthenticationBackend",
)
앱을 추가합니다.(Google용 앱 포함)
INSTALLED_APPS += (
    # The Django sites framework is required
    'django.contrib.sites',
    'allauth',
    'allauth.account',
    'allauth.socialaccount',
    # Login via Google
    'allauth.socialaccount.providers.google',
)

SITE_ID = 1
’+ =’를 사용하여 기존 설치된 INSTALLED_APPS 설정에 섵치된 Apps를 추가합니다.
SITE_ID 매개 변수는 Django 사이트 프레임워크에서 사용됩니다.
마지막으로 다음 매개 변수를 설정하여 권한 부여 프로세스를 커스텀합니다.
ACCOUNT_USERNAME_REQUIRED = False
ACCOUNT_EMAIL_VERIFICATION = "none"
SOCIALACCOUNT_QUERY_EMAIL = True
LOGIN_REDIRECT_URL = "/"
이렇게 하면 allauth가 승인 프로세스에서 이메일을 요청할 수 있습니다(가능한 경우). 확인 프로세스 없이 Google에 요청할 것이며, 로그인 한 후 사용자에게 홈페이지로 리다이렉션합니다.
사용 가능한 설정를 참조하세요.
Urls
‘taskbuster/urls.py’ 파일을 열고 i18n internationalization urls 앞에 해당하는 URL을 추가합니다.
urlpatterns = [
    url(r'^(?P<filename>(robots.txt)|(humans.txt))$',
        home_files, name='home-files'),
    url(r'^accounts/', include('allauth.urls')),
]

urlpatterns += i18n_patterns(
   ...
)
Database migrations
데이터베이스를 업데이트합니다.
$ python manage.py check
$ python manage.py migrate
Sites configuration
이제 사이트 프레임워크를 구성해야합니다. 다음 명령으로 개발 서버를 실행합니다.
$ python manage.py runserver
관리자 인터페이(http://127.0.0.1:8000/en/admin/sites/site/)으로 접속하여 localhost, 127.0.0.1:8000, 프로덕션을 위한 도메인을 가진 사이트를 만듭니다. example.com으로 사이트를 정의한 경우 설정의 SITE_ID=1 변수와 동일한 ID를 가지도록 수정하세요. 그렇지 않으면 새 사이트를 만드는 경우 방금 만든 사이트의 ID(아마도 2)로 설정 변수SITE_ID를 변경해야 합니다.
Google 앱을 만든 준비가 되었습니다.
Google App registration
먼저 Googlr App을 만들어 키/비밀 쌍을 획득합니다. Google Developers Console으로 이동하여 Create Project를 클릭하고 프로젝트 이름과 ID를 선택하세요.
그런 다음 새로 생성 된 프로젝트를 클릭하고 왼쪽 메뉴에서 APIs & auth –> Credentials를 선택하고 Consent screen 탭을 클릭하세요. 적어도 이름과 이메일을 제공해야 합니다.
Credentials 탭으로 이동하여 Create new Client ID를 클릭하세요. Web Application를 선택하고 사용하세요.
Authorized Javascript Origins: http://127.0.0.1:8000/

Authorized Redirect Uris: http://127.0.0.1:8000/accounts/google/login/callback/
자동으로 제안된 리다이렉션 URI는 여기에 쓰여진 것과 다릅니다.
이 앱은 우리의 개발 및 테스트 환경에서 작동합니다. prod 용으로 다른 클라이언트/보안 쌍을 만들어야 하며 웹 사이트 도메인에 따라 http://127.0.0.1:8000/ 을 변경해야 합니다.
Google 앱을 준비했으므로 Django 부분을 구성해봅시다.
Allauth Django configuration
http://127.0.0.1:8000/admin/socialaccount/socialapp 에서 Google의 소셜 앱을 만들고 다음 속성을 사용하세요.
- Provider: Google
- Name: Google (혹은 비슷한 이름)
- Client ID: your application Client ID (Developers Console의 APIs & auth –> Credentials에서 가져오세요).
- Secret Key: your application Client Secret
- Key: 필요 없음(비워둠)
- 해당 사이트를 선택하세요.
마지막으로 인스턴스를 저장하세요.
Testing the user flow
이제 테스트를 실행할 준비가 되었습니다.
$ python manage.py test functional_tests.test_all_users.TestGoogleLogin
첫 번째로 홈페이지에 id가 google_login인 요소가 없어서 실패합니다.
‘taskbuster/templates/base.html’ 파일을 편집하고 navigation bar를 찾으세요. 폼 태그를 다음 코드로 대체해야 합니다.
<div class="navbar-collapse collapse">
  <div class="navbar-form navbar-right">
    {% if user.is_authenticated %}
      <a id="logout" href="/accounts/logout" class="btn btn-success">Logout</a>
    {% else %}
      <a id="google_login" href="/accounts/google/login" class="btn btn-success">
        Sign in with Google
      </a>
    {% endif %}
  </div>
</div><!--/.navbar-collapse -->
사용자가 로그인하지 않은 경우에만 로그인 버튼을 표시하고 다른 경우에는 로그아웃 버튼을 표시하기 위해 몇 가지 로직을 포함시켰습니다.
테스트를 다시 실행하면 로그인 버튼을 클릭한 후 내부 오류가 발생합나디. 이는 테스트 데이터베이스에 Google 앱이 정의되어 있지 않기 때문입니다.(테스트 데이터베이스가 비어 있습니다.)
개발 데이터베이스에는 사이트, Google 앱, 관리자만 있으므로 데이터를 덤프하여 fixture를 만듭니다.
먼저, fixtures 폴더를 만듭니다.
$ mkdir taskbuster/fixtures
다음은, fixture를 만듭니다.
$ python manage.py dumpdata --indent 2 --natural-foreign -e contenttypes -e auth.Permission > taskbuster/fixtures/allauth_fixture.json
fixtures에는 중요한 정보가 있으므로 ‘.gitignore’ 파일에 추가합니다.
다음으로 테스트에서 fixture를 로드해야 합니다. ‘settings/test.py’에 fixture 경로를 지정해줍니다.
FIXTURE_DIRS = (
    os.path.join(BASE_DIR, 'fixtures'),
    )
그리고 test 클래스의 시작 부분에 다음과 같은 fixture를 포함시킵니다.
class TestGoogleLogin(StaticLiveServerTestCase):

    fixtures = ['allauth_fixture']

    def setUp(self):
        ...
이제 테스트를 다시 실행합니다.
$ python manage.py test functional_tests.test_all_users.TestGoogleLogin
이번에는 사용자가 로그인 할 사용자 이름과 비밀번호를 표시해야하는 Google 인증 페이지가 표시되며 로그 아웃 버튼을 찾을 수 없으므로 테스트가 실패합니다.
자격 증명을 삽입하는 테스트를 해봅니다. ‘taskbuster/fixtures/google_user.json’ 파일을 생성하고 다음 내용을 기입합니다.
{"Email": "example@gmail.com", "Passwd": "example_psw"}
유효한 Google 계정 정보를 입력해야 합니다. 이 파일은 fixtures 폴더 아래 있기 때문에 Git에는 포함되지 않습니다.
Email, Passwd 키는 Google 로그인 양식의 html 요소 ID입니다.
그런 다음 로그인 버튼을 클릭 한 후 호툴 될 테스트 내부에 다음 메서드를 추가합니다.
class TestGoogleLogin(StaticLiveServerTestCase):
    ...
    def user_login(self):
        import json
        with open("taskbuster/fixtures/google_user.json") as f:
            credentials = json.loads(f.read())
        self.get_element_by_id("Email").send_keys(credentials["Email"])
        self.get_button_by_id("next").click()
        self.get_element_by_id("Passwd").send_keys(credentials["Passwd"])
        for btn in ["signIn", "submit_approve_access"]:
            self.get_button_by_id(btn).click()
        return
    def test_google_login(self):
        ...
        google_login.click()
        self.user_login()
        ...
이 테스트를 다시 실행하면 브라우저에 다음 메시지가 표시됩니다.
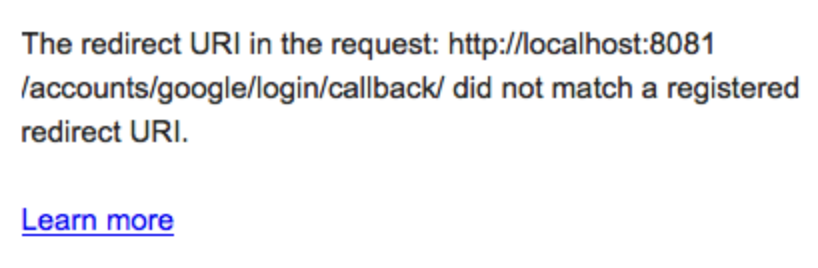
http://localhost:8081 이 리다이렉션 URI가 유효하지 않음을 나타냅니다. 이는 테스트에서 사용하는 URL이 아닌 http://127.0.0.1:8000 이라는 다른 URL을 등록했기 때문입니다.
개발자 콘솔로 돌아가 url http://localhost:8081 과 해당 콜백 URL을 앱에 등록하세요.
그런 다음 ‘taskbuster/fixtures/allauth_fixture.json’을 열고 localhost:8081에 대해 127.0.0.1:8000의 모든 항목을 바꿉니다.(3으로 계산)
다시 테스트를 실행하세요.
이제 인증 프로세스가 성공적으로 진행되었습니다.
하지만, 로그아웃 버튼을 클릭하면 확인 양식이 들어있는 다른 URL로 리다이렉션 됩니다.
이 단계를 생략하려면 ‘taskbuster/urls.py’파일을 편집하고 allauth.urls 를 포함시키기 전에 다음 행을 추가하세요.
url(r'^accounts/logout/$', 'django.contrib.auth.views.logout', {'next_page': '/'}),
이렇게 하면 사용자는 로그아웃 버튼을 클릭한 후 홈페이지로 되돌아갑니다.
테스트를 다시 실행하면 제대로 작동합니다.
트위터로 로그인하기 단계도 있지만, 국내에서는 트위터가 대세가 아니라서 건너뜁니다.
지금은 구글 로그인 태그들이 바뀌어서 테스트가 제대로 동작하지 않는 것 같습니다. 코드를 이리 저리 수정했는데 마지막 로그인 버튼이 자동으로 클릭이 되지 않네요. 이 부분만 넘어가면 테스트를 끝낼 수 있을텐데, 아직 삽질 중입니다.
삽질은 답답하지만, 실력 향상에는 이만한게 없으니!!
계속 업데이트 중.
Let me know what you think of this article in the comment section below!