TaskBuster Django Tutorial – Part 6 - Documenting the TaskBuster Django Boilerplate
Documenting the TaskBuster Django Boilerplate
이번 튜토리얼에서는 문서화에 대해 다룹니다. TaskBuster 프로젝트는 충분히 문서화가 되어 있고, 국제화, 현지화, 시간대를 지원하는 기능적인 홈페이지이고, 테스트가 모두 커버하고 있습니다.
하지만 공동 작업자를 염두에 두고 이 프로젝트를 준비했습니다. 다른 사람들이 지금까지 만들어온 것을 다운받아서 자신의 Django 프로젝트 템플릿으로 사용할 수 있습니다.
하지만, 다른 사람이 다운 받아 설치하고, 구성하고, 실행하는데 필요한 모든 정보를 갖도록 문서화를 잘 해야 합니다.
이 파트의 개요는 다음과 같습니다.
- Install and configure Sphinx
- Documenting the TaskBuster Django Project Boilerplate
- Upload your project on GitHub
- Upload your Docs on ReadTheDocs
일반적으로 reStructuredText(reST)를 사용하여 마크업 형식으로 문서를 작성합니다. 특별한 형식없이 일반 텍스트 파일을 작성합니다.
TaskBuster
==========

Welcome to the TaskBuster Documentation
그런 다음 컴파일합니다. 결과는 큰 제목(TaskBuster)와 단락(Welcome to the TaskBuster Documentation)이 있는 멋진 html파일입니다. Read The Docs에서 더 많은 예를 볼 수 있습니다. 여기에서는 모든 사람들이 최종 문서를 업로드하여 볼 수 있습니다.
우리가 사용할 도구는 Sphinx입니다. Python 패키지는 코드파일의 docstring을 가져와서 문서 내부에 자동으로 포함시킵니다.
Install and configure Sphinx
개발 환경에만 sphinx를 설치합니다.(테스트 환경에서도 원할 경우) 가상환경을 활성화하고 다음을 입력하세요.
$ pip install sphinx
마지막 메시지를 보면 다른 패키지들이 설치된 것을 확인할 수 있습니다.
Successfully installed Jinja2-2.10 MarkupSafe-1.0 Pygments-2.2.0 alabaster-0.7.11 babel-2.6.0 certifi-2018.8.24 chardet-3.0.4 docutils-0.14 idna-2.7 imagesize-1.0.0 packaging-17.1 pyparsing-2.2.0 requests-2.19.1 six-1.11.0 snowballstemmer-1.2.1 sphinx-1.7.8 sphinxcontrib-websupport-1.1.0 urllib3-1.23
모두 requirements에 추가해야 합니다.
‘taskbuster_project’ 폴더 안으로 들거아서 다음과 같이 Sphinx를 구성합니다.
# 원문의 진행과 실습의 스핑크스 버전의 차이에 따라 docs 디렉터리를 구성하고 진행합니다.
$ mkdir docs
$ cd docs
$ sphinx-quickstart

Welcome to the Sphinx 1.7.8 quickstart utility.

Please enter values for the following settings (just press Enter to
accept a default value, if one is given in brackets).

Selected root path: .

You have two options for placing the build directory for Sphinx output.
Either, you use a directory "_build" within the root path, or you separate
"source" and "build" directories within the root path.
# 별도의 소스 및 빌드 디렉터
> Separate source and build directories (y/n) [n]: n

Inside the root directory, two more directories will be created; "_templates"
for custom HTML templates and "_static" for custom stylesheets and other static
files. You can enter another prefix (such as ".") to replace the underscore.
# 템플릿 및 정적 디렉터리의 접두사
> Name prefix for templates and static dir [_]: _

The project name will occur in several places in the built documentation.
> Project name: TaskBuster
> Author name(s): Doky
> Project release []: 0.1.0

If the documents are to be written in a language other than English,
you can select a language here by its language code. Sphinx will then
translate text that it generates into that language.

For a list of supported codes, see
http://sphinx-doc.org/config.html#confval-language.
> Project language [en]: en

The file name suffix for source files. Commonly, this is either ".txt"
or ".rst".  Only files with this suffix are considered documents.
# 소스 파일 접미사
> Source file suffix [.rst]: .rst

One document is special in that it is considered the top node of the
"contents tree", that is, it is the root of the hierarchical structure
of the documents. Normally, this is "index", but if your "index"
document is a custom template, you can also set this to another filename.
# 마스터 문서의 이름(접미어 제외)
> Name of your master document (without suffix) [index]: index

Sphinx can also add configuration for epub output:
# epub 빌더 사용 여부
> Do you want to use the epub builder (y/n) [n]: n
Indicate which of the following Sphinx extensions should be enabled:
# 자동으로 모듈에서 문서화 문자열을 삽입
> autodoc: automatically insert docstrings from modules (y/n) [n]: n
# doctest가 블록 코드 조각을 자동으로 테스트
> doctest: automatically test code snippets in doctest blocks (y/n) [n]: n
# 다른 프로젝트의 스핑크스 문서 간의 링크
> intersphinx: link between Sphinx documentation of different projects (y/n) [n]: n
# 빌드에 표시하거나 숨길 수 있는 todo 리스트 작성
> todo: write "todo" entries that can be shown or hidden on build (y/n) [n]: n> coverage: checks for documentation coverage (y/n) [n]: n
# PNG나 SVG 이미지로 렌더링된 math 포함
> imgmath: include math, rendered as PNG or SVG images (y/n) [n]: n
# MathJax에 의해 브라우저에서 렌더링된 math 포함
> mathjax: include math, rendered in the browser by MathJax (y/n) [n]: n
# config 값을 기반으로한 조건 포함
> ifconfig: conditional inclusion of content based on config values (y/n) [n]: n
# 문서화된 python 객체의 소스 코드에 대한 링크 포함
> viewcode: include links to the source code of documented Python objects (y/n) [n]: n
# 깃헙에 게시할 .nojekyll 파일 만들기
> githubpages: create .nojekyll file to publish the document on GitHub pages (y/n) [n]: n

A Makefile and a Windows command file can be generated for you so that you
only have to run e.g. `make html' instead of invoking sphinx-build
directly.
> Create Makefile? (y/n) [y]: y
> Create Windows command file? (y/n) [y]: n

Creating file ./conf.py.
Creating file ./index.rst.
Creating file ./Makefile.

Finished: An initial directory structure has been created.

You should now populate your master file ./index.rst and create other documentation
source files. Use the Makefile to build the docs, like so:
   make builder
where "builder" is one of the supported builders, e.g. html, latex or linkcheck.
윈도우 사용자는 마지막 질문에 ‘y’로 답하세요.
docs 폴더가 아래와 같은 구조로 구성됩니다.
docs
├── Makefile
├── _build
├── _static
├── _templates
├── conf.py
└── index.rst
‘conf.py’파일을 편집합니다. sys, os를 임포트후 추가합니다.
sys.path.insert(0, os.path.abspath('..'))
from django.conf import settings
settings.configure()
최상위 폴더인 ‘taskbuster_project’를 시스템 경로에 포함시킵니다. 이것은 스핑크스에게 프로젝트 파일이 어디있는지 알려줍니다.
docs 폴더로 이동하여 다음을 입력합니다.
$ make html
실행하면 다음과 같은 것을 볼 수 있습니다.
build succeeded.

The HTML pages are in _build/html.
# 버전에 따라 다르지만, 비슷한 문구를 확인해야 합니다.
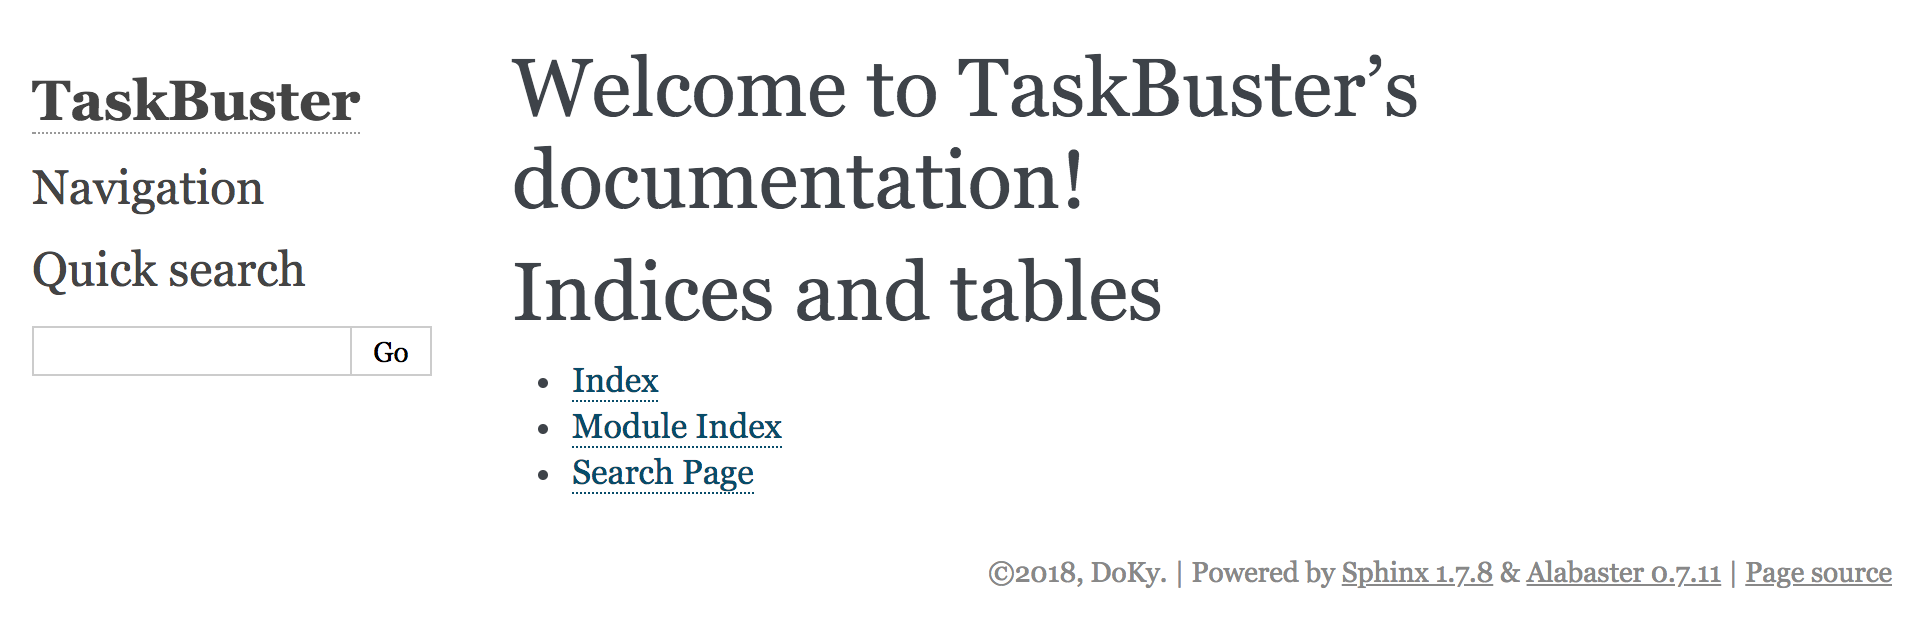
‘_build/html’ 폴더에 들어가서 브라우저로 index.html파일을 확인하세요. 그럼 다음과 같은 화면을 볼 수 있습니다.
$ open ./index.html
이 시점이 커밋하기 좋은 시점입니다.
$ git add .
$ git status
$ git commit -m "Sphinx installed and configured"
$ git push origin master
Documenting the TaskBuster Django Project Boilerplate
docs 폴더 안에는 문서 색인이 있는 index.rst 파일이 있습니다. 아래 내용으로 일부 내용을 추가합니다.
Welcome to TaskBuster's documentation!
======================================

This is an awesome **Django Project Boilerplate**!!

With this code you can start a *complex* Django Project
very quickly, with just a few steps!

Some of the TaskBuster Django Project Boilerplate functionalities are:

- **different virtual environments** for developing, testing and production
- **Internationalization** and **localization** to support different languages
- Project structure
- **HTML5 Boilerplate**
- Template Inheritance
- Functional **tests**
- robots.txt and humans.txt configured

Moreover, you can learn how to create this boilerplate **step by step**
in the |taskbuster_tutorial|. There you can learn, step by step, how
TaskBuster has been done, and even do it yourself if you want to!!

.. |taskbuster_tutorial| raw:: html

    <a href="http://marinamele.com/taskbuster-django-tutorial"
    target="_blank">TaskBuster Django Tutorial</a>

To start using the Boilerplate, check out the :doc:`requirements`
and next the :doc:`quick_start`.

Contents
--------

.. toctree::
   :maxdepth: 2

   requirements
   quick_start


Indices and tables
==================

* :ref:`genindex`
* :ref:`modindex`
* :ref:`search`
이 파일은 TaskBuste 프로젝트를 설명하고, toctree 지시문 이후 두 개의 서로 다른 파일인 requirements.rest와 quick_start.rst를 포함합니다.
docs 폴더 안에 두 파일을 모두 만듭니다.
$ touch docs/{requirements.rst,quick_start.rst}
requirements.rst 파일은 Django 프로젝트 Boilerplate를 사용하는데 필요한 모든 요구 사항을 포함하고, quick_start.rst는 사용하는 바법을 설명하고 Boilerplate를 개인화 할 것입니다.(예. 프로젝트 이름이나 번역 언어를 변경)
이 파일에는 다음이 포함됩니다.
Requirements
============

The requirements necessary to use this Django Project Boilerplate are:

- **python3** and **pip3**
- **virtualenv and virtualenvwrapper**
- **Firefox** (to use Selenium's Webdriver in functional Tests)
- **GNU gettext** (to use Internationalization)

If you don't have the first two requirements, you may find this
post useful: |python_install|.

.. |python_install| raw:: html

    <a href="http://www.marinamele.com/2014/07/install-python3-on-mac-os-x-and-use-virtualenv-and-virtualenvwrapper.html" target="_blank">Install Python 3 on Mac OS X and use virtualenv and virtualenvwrapper</a>

You can download Firefox from the official web page: |firefox_web|.

.. |firefox_web| raw:: html

    <a href="https://www.mozilla.org" target="_blank">Firefox</a>

And if you don't have GNU gettext, check this |taskbuster_section|.

.. |taskbuster_section| raw:: html

    <a href="http://marinamele.com/taskbuster-django-tutorial/internationalization-localization-languages-time-zones" target="_blank">TaskBuster tutorial section</a>


**Ready!?** Continue to the :doc:`quick_start`!
Quick Start Guide
=================


Download TaskBuster Django Project Boilerplate
----------------------------------------------

First, you need to download the BoilerPlate from GitHub.


Secret Django Key
-----------------

This boilerplate has the **DJANGO_KEY** setting variable hidden.

You can generate your DJANGO_KEY |django_key|.

.. |django_key| raw:: html

    <a href="http://www.miniwebtool.com/django-secret-key-generator"
    target="_blank">here</a>


Project Name
------------

This project is named *TaskBuster*, so if you are using this
Boilerplate to create your own project, you'll have to change
the name in a few places:

 - *taskbuster_project* **folder** (your top project container)
 - *taskbuster_project/taskbuster* **folder** (your project name)
 - virtual environment names: **tb_dev** and **tb_test** (name them whatever you want)
 - in virtual environments **postactivate** files (see section below), you have to change **taskbuster.settings.development** for your **projectname.settings.development**. Same works for the testing environment.


Virtual environments and Settings Files
---------------------------------------

First, you must know your Python 3 path::

    $ which python3

which is something similar to /usr/local/bin/python3.

Next, create a Development virtual environment with Python 3 installed::

    $ mkvirtualenv --python=/usr/local/bin/python3 tb_dev

where you might need to change it with your python path.

Go to the virtual enviornment folder with::

    $ cd $VIRTUAL_ENV/bin

and edit the postactivate file.:

    $ vi postactivate

You must add the lines: ::

    export DJANGO_SETTINGS_MODULE="taskbuster.settings.development"
    export SECRET_KEY="your_secret_django_key"

with your project name and your own secret key.

Next, edit the **predeactivate** file and add the line::

    unset SECRET_KEY

Repeat the last steps for your testing environment::

    $ mkvirtualenv --python=/usr/local/bin/python3 tb_test
    $ cd $VIRTUAL_ENV/bin
    $ vi postactivate

where you have to add the lines::

    export DJANGO_SETTINGS_MODULE="taskbuster.settings.testing"
    export SECRET_KEY="your_secret_django_key"

and in the predeactivate file::

    unset SECRET_KEY

Next, install the packages in each environment::

    $ workon tb_dev
    $ pip install -r requirements/development.txt
    $ workon tb_test
    $ pip install -r requirements/testing.txt


Internationalization and Localization
-------------------------------------

Settings
********

The default language for this Project is **English**, and we use internatinalization to translate the text into Catalan.

If you want to change the translation language, or include a new one, you just need to modify the **LANGUAGES** variable in the file *settings/base.py*. The language codes that define each language can be found |codes_link|.

.. |codes_link| raw:: html

    <a href="http://msdn.microsoft.com/en-us/library/ms533052(v=vs.85).aspx" target="_blank">here</a>

For example, if you want to use German you should include::

    LANGUAGES = (
        ...
        'de', _("German"),
        ...
    )

You can also specify a dialect, like Luxembourg's German with::

    LANGUAGES = (
        ...
        'de-lu', _("Luxemburg's German"),
        ...
    )

Note: the name inside the translation function _("") is the language name in the default language (English).

More information on the |internationalization_post|.

.. |internationalization_post| raw:: html

    <a href="http://marinamele.com/taskbuster-django-tutorial/internationalization-localization-languages-time-zones" target="_blank">TaskBuster post</a>


Translation
***********

Go to the terminal, inside the taskbuster_project folder and create the files to translate with::

    $ python manage.py makemessages -l ca

change the language "ca" for your selected language.

Next, go to the locale folder of your language::

    $ cd taskbuster/locale/ca/LC_MESSAGES

where taskbuster is your project folder. You have to edit the file *django.po* and translate the strings. You can find more information about how to translate the strings |translation_strings_post|.

.. |translation_strings_post| raw:: html

    <a href="http://marinamele.com/taskbuster-django-tutorial/internationalization-localization-languages-time-zones#inter-translation" target="_blank">here</a>

Once the translation is done, compile your messages with::

    $ python manage.py compilemessages -l ca


Tests
*****

We need to update the languages in our Tests to make sure the translation works correclty. Open the file *functional_tests/test_all_users.py*:

- in **test_internationalization**, update your languages with the translation of title text, here "Welcome to TaskBuster!"
- in **test_localization**, update your languages.


Useful commands
---------------

A list of all the commands used to run this template::

    $ workon tb_dev
    $ workon tb_test

    $ python manage.py makemessages -l ca
    $ python manage.py compilemessages -l ca
그런 다음 html 빌더를 다시 실행하여 변경사항을 확인하세요.
$ make html
Upload your project on GitHub
$ git add .
$ git status
$ git commit -m "Documentation ready"
Upload your Docs on ReadTheDocs
ReadTheDocs의 계정을 만드세요.
그리고 GitHub 계정을 연결하고 기거에서 프로젝트의 문서를 가져오세요.
GitHub에서 원하는 프로젝트를 가져와서 ReadTheDocs에서 문서를 만들어야 합니다.
여기에서 결과를 볼 수 있습니다.
Let me know what you think of this article in the comment section below!